Inspiration
As a software engineer I think we often have to do things we don’t yet understand or, if unlucky, we have to operate in domains we have no experience in at all. So to make life generally less stressful many of us work on small home projects, which are complex enough that you can learn how to set-up projects, how to manage automation, how to structure code, how to document, how to test etc. Obviously this is additional effort on top of our daily jobs, so if we can enjoy doing it, and better yet have something fancy to show for our work, then it may be just a bit easier to do.
To me ray tracing is one of such projects. It has nice, semi complicated math, project complexity and computational requirements which can be done badly at first then they can be iterated upon, while always producing some tangible results. In this case, nice renders.
“Ray Tracing in One Weekend” series
We should start with a huge thank you for anyone who wrote or contributed to Ray Tracing in One Weekend! A marvelous little series, which is simple enough that it can be done relatively quickly yet competent enough to give a taste of what ray tracing is about and what it can do. To be honest I may have not have even started playing around with ray tracing if I didn’t find a nice tutorial about it. Thankfully Ray Tracing in One Weekend exists, so I did start, and had quite a bit of fun following it!
The tutorial is competently written, easy to understand and most importantly it works! Now one may argue, that it doesn’t use the newest standard or that it uses some outdated coding practices. Obviously nothing is perfect, but the value is there just the same, and if you really don’t like it you can modify it to your hearts content. Pointing this out to those people who may be new to the world of programming. Who know enough to be able to write something, to know what are the newest trends, but who may not have seen “legacy code” or encountered real world production code. I find this especially important, because if the reader is anything like I was at the start of my carrier, they might find themselves hesitant to even start things that aren’t the cutting edge. In hindsight I can tell you, such omissions are always detrimental. The way to write something may change, but the experience we gather will translate just the same.
On that note there is one thing I would like to add to the tutorial, which is sorely missing from it. That is multithreaded support. (At the time of writing there is a ticket to introduce this, which hasn’t been mainlined in 4 years, so I will propose my little solution here). These renders take a long time to execute and if you have some modern hardware we really should use it. The way I did it can be found in the section A naive multithreading support, but first let’s look at the renders you may make should you decide to try ray tracing yourself.
Maybe in the future I will try and add OpenGL or Vulcan support. Will see how long my interest holds and how hard it is. That is the beauty of these tutorials, we can start small, test the waters so to speak and see if we like it enough to go further.
Scenes
All of the following scenes were rendered on a Intel® Core™ i5-7600K Processor, which has only four cores and no hyper-threading support.
Ray tracing in one weekend
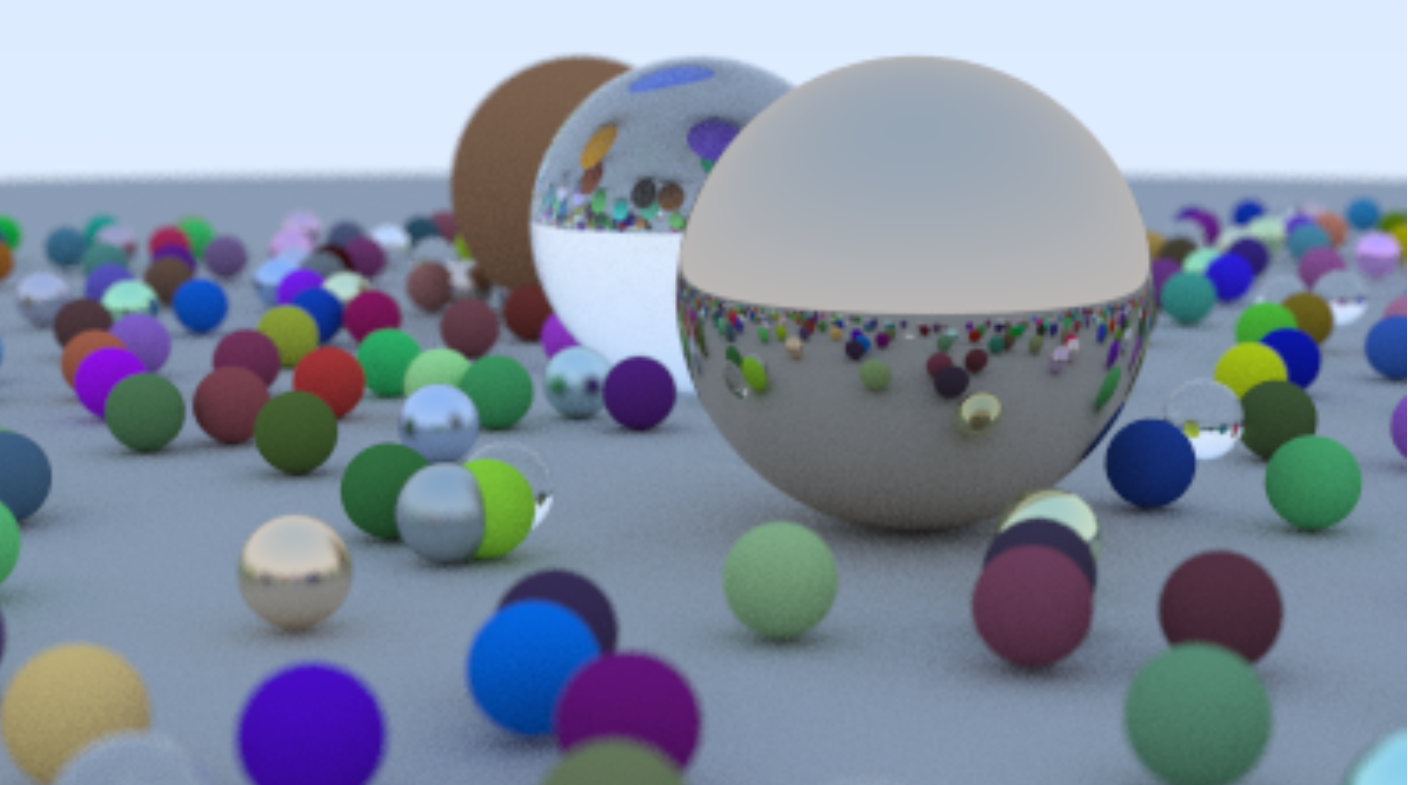
The final scene in Ray Tracing in One Weekend. From the front to back we have 3 spheres, the first being a shiny metal one, the second one made out of glass and the 3rd of some random diffuse material. The rest of the tiny spheres are all random, and were placed randomly. The surface everything rests on is also just a huge sphere.
What I find interesting in this picture how unnatural the glass spheres look, just floating around with minimal shadows.
For this image I didn’t track rendering time, but it was around a few hours.
Ray tracing in one weekend final scene
Ray tracing the next week
The final scene in Ray Tracing: The Next Week.
From the top there is a rectangle shaped light, then a diffuse sphere which is moving slightly while the camera is exposed, giving it a nice motion blur. Then a sphere textured as the Earth. Another glass sphere which has some fog inside it, then a cube made out of hundreds of small diffuse spheres. Finally, a blue diffuse sphere inside a glass sphere simulating some subsurface scattering. This one looks really good in my opinion. Somehow I look at it and it feels right. Can’t really say that about the other objects though.
Then the good old glass sphere with some nice caustic lights, and a diffuse metal sphere, while the ground is made up of various cubes with random elevation. The whole scene takes place inside a huge foggy sphere.
With about 5000 samples per ray and 50 depth the scene took about:
real    1143m34.296s
user    2533m29.375s
sys     0m56.513s
in other words 19 hours to render. The image isn’t big at all at 800x800 pixels.

Ray tracing the next week final scene
Cornell box
An intermediate scene from Ray Tracing: The Next Week, but even though it doesn’t look nearly as good as the previous scene it is more interesting in my opinion. As the “Hello World” scene of the ray tracing world you would assume that this should be a simple scene to render. However, it really isn’t. You have a box, which may or may not have closed sides (this one was fully enclosed), a single light source at the top and two slightly rotated rectangular cuboids. You would assume that since we don’t have glass, mirrors, and because it just feels so simple, that this would render fast and cleanly. It won’t.
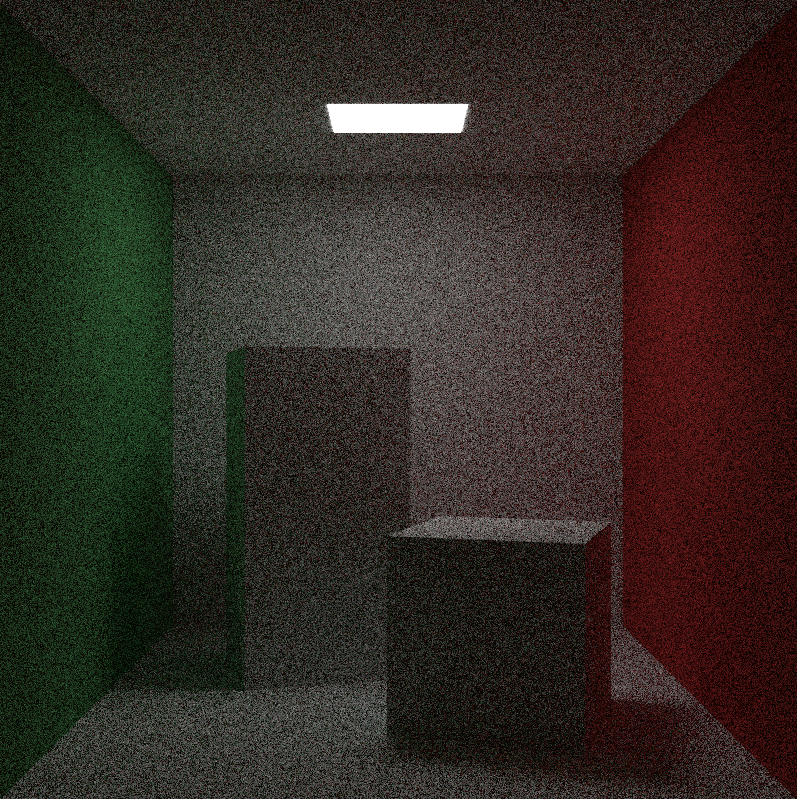
Cornell box with 100 samples
As you can see, with just a hundred samples per ray bounce it will remain very noisy. The reason is that we have a single light source and aren’t using any light rays. Light rays are rays that some ray tracers run from each bouncing point towards the light sources. This significantly reduces noise in the image, because all points will by design receive some contribution from each light source (well, of course if they can). This ray tracer doesn’t do that, but it will simply track where our currently simulated light ray is going. This may or may not eventually reach the light source. If it doesn’t the given pixel will remain black or some other combination of too dark and generally discolored.
If we increase the number of samples to about 3000 thousand per ray bounce, we significantly increase the chance for the rays to reach the light. The rendering time for this scene at 800x800 pixels, 50 ray bounces and 3000 samples per bounce was:
real    564m36.481s
user    2220m37.144s
sys     2m30.720s
or around 9.5 hours.
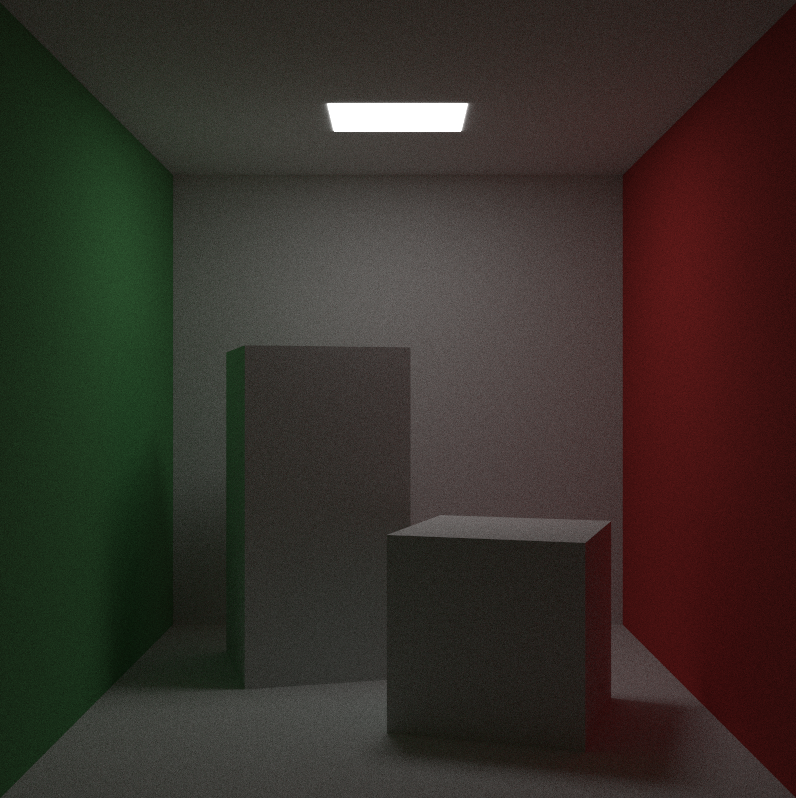
Cornell box with 3000 samples
Rather expensive in terms of rendering time, for such a simple scene. Makes me wonder what kind of rendering power is put behind the animated movies behind Disney or Pixar. Granted they likely aren’t running anything on a CPU like we are, nevertheless, if a single image could take hours, how much could a full movie take?
A naive multithreading support
The original tutorial does not use multithreading, or at least the version I have read didn’t. I would be very much interested in how long these scenes took to render with the original version on a single core, because even with multiple ones some scenes may take around a day.
To enable some multithreaded support here is what I have done:
| |
This requires a compiler supporting C++20 and you need to include headers:
#include <future>
#include <thread>
You can switch to this code after section the rendering code above has been stabilized in Ray Tracing: The Next Week.
Additionally you have to ensure that there are no race conditions anywhere or the resulting undefined behavior will destroy your renders. In my case the only thing that needed to be protected was the random_double function, because it would initialize a static distribution and mersenne twister in other worlds there would be only one instance of it for all threads. Thankfully the fix is dirty and quick, just add the thread_local to it. Sure, it isn’t optimal, but it works.
auto random_double() -> double
{
  static thread_local std::uniform_real_distribution<double> distribution(0.0, 1.0);
  static thread_local std::mt19937 generator;
  return distribution(generator);
}
That is all you need to do. Now you can spare some time, depending on how many threads you have. One last thing. You may notice that my code is a little different from the original. This is because I didn’t want to introduce the color type when it is just a vec3 and I have packaged most of scene related fields into a struct like so:
struct SceneConfig
{
  hittable_list world;
  vec3 background_color;
  vec3 look_from;
  vec3 look_at;
  vec3 view_up;
  double v_fow;
  double dist_to_focus;
  double aperture;
};
Bonus scene and full disclosure
If you have read this far as a reward here is my own scene and after that I will let you in on a little secret.
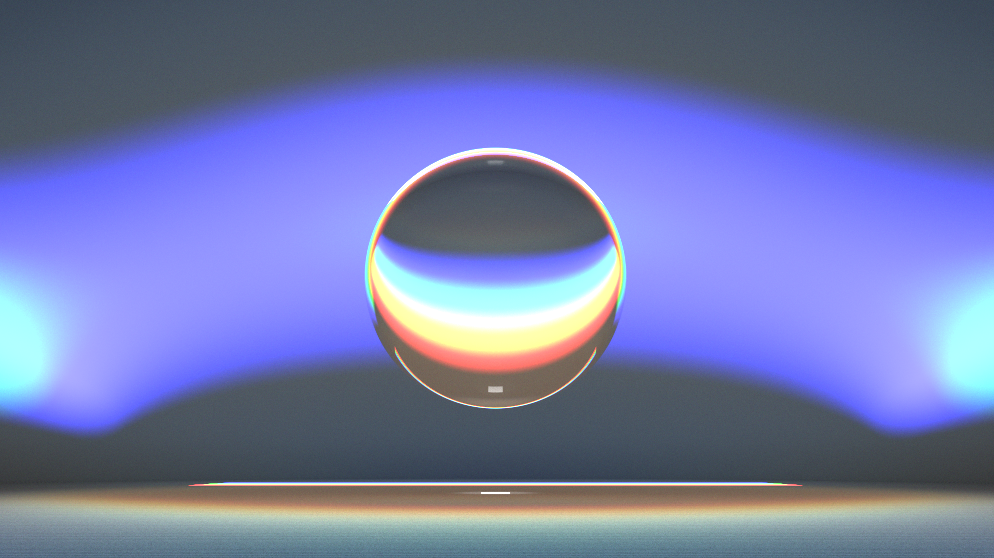
Lights and floating glass sphere
Since we are working with simulations, why not do something that would be impossible to see in real life? At least that was my inspiration for this one.
Inside the grayish metallic dome, there is a single floating glass sphere. There is a simple diffuse white colored floor and 4 lights in total. One white light right below the sphere and three rectangle shaped colored ones side by side, in order away from the camera, red, green and blue. The combination of these 3 lights makes that bluish reflection on the dome. The rainbow color in the glass sphere is just a result of these colors mixing through it.
I have made an upsie!
The thing is that throughout this whole project I simply forgot to turn on build optimizations. Imagine my shock when after turning them on, everything ran around 6 times faster. Well, what can you do? We all goof up all the time.
On the bright side this final scene could be rendered with 10'000 samples per ray bounce, with 50 depth at 1000 * 562 pixels and it took about 8 hours in total. Don’t forget to turn on your optimizations!